There are several steps involved in replacing the barrel cam chains. Two key steps, however, are aligning (phasing) the chains and adjusting the tensioner cylinder switches.
NOTE: The images displayed in this topic are for reference only; your machine may be slightly different
NOTE: Replacing the barrel cam chain is a two-person job
| 3. | If air on tensioner has not been dropped, do so now |
| a. | Make sure ratchet locks are lifted while dropping air |

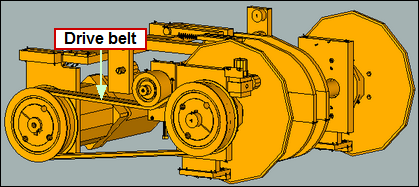
| 4. | Remove drive belt to make it easier to manually move entire barrel cam |
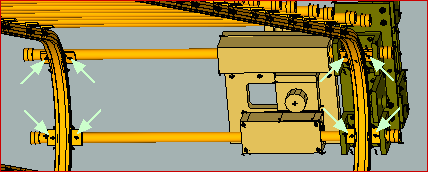
| 5. | Remove bucket carriages by removing bolts from underside of tabs which are attached to chains |
| a. | There are eight bolts, four on each side of barrel cam |
NOTE: The best access point is on upstream end of barrel cam assembly
NOTE: Take care when moving bucket carriage assemblies as shafts freely slide out
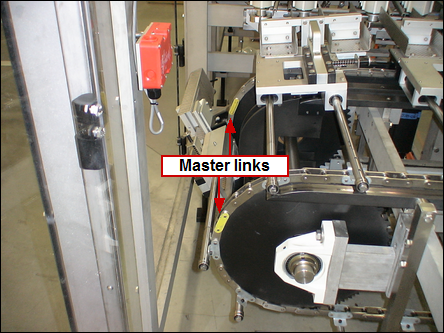
| 6. | Look for master links, which are generally painted a different color |
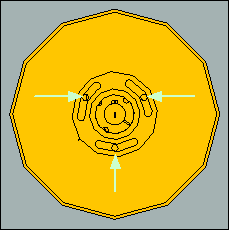
| 8. | Move tensioner assembly at downstream end of barrel cam back and forth to make sure it moves freely without side-to-side movement, and that it is square |
| a. | Remember to lift ratchet locks |
| b. | If it is not free, locate bind point and correct |
| c. | If it is not square or has side-to-side movement, check bolts on tensioner assembly for tightness; square and re-tighten bolts if necessary |
| 10. | Make sure chains are aligned |
| a. | The same link (inner or outer) type should be in same position and on same sprocket tooth when looking across sprockets |
| b. | Position master links so they are generally across from each other |
| 11. | Align chains with each other |
| a. | Clamp a metal squaring block to a cross member |
| b. | Position squaring block so carriage assembly tabs attached to chain meet it |
| c. | Do this for both chains |
NOTE: Make sure squaring block is positioned on same side of tab and on same side of frame member as on opposite side of barrel cam
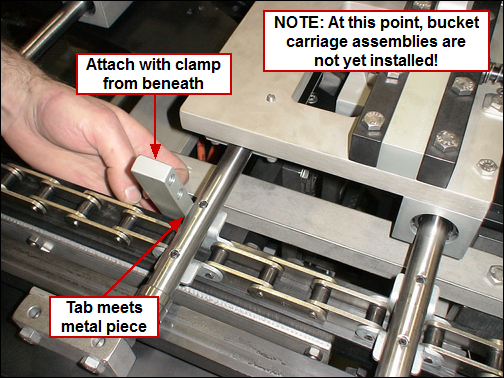
| d. | Move barrel cam chains so tabs meet attached squaring blocks |
| e. | If tabs from both chains do not meet attached squaring blocks at exactly same time, chains need to be phased |
| i. | To phase chains, loosen bolts on slotted sprocket on driven end |
| ii. | Turn sprocket in slots to adjust chain to match chain position on other side of barrel cam exactly |
| v. | Remove squaring blocks and clamps |
| 12. | Reattach one bucket carriage assembly |
| a. | Use Loctite blue (medium) |
| 13. | Manually rotate barrel cam one full revolution to verify chains are in rails |
| 14. | Reattach rest of bucket carriage assemblies |
| a. | Use Loctite blue (medium) |
| 15. | Again, manually rotate barrel cam one full revolution to check if chains are in rails |
| 16. | If rails have been replaced, install one bucket |
| a. | Rotate barrel cam to check bucket to forming/compression deck clearance |
| b. | Adjust deck if necessary |
| i. | Clearance should be thickness of one carton |
NOTE: Carton must move freely, without binding
| 17. | Install remaining buckets |
| 18. | Restore air to tensioning cylinder(s) |
| 22. | If carton flight chain has been replaced on an older machine which has carton flight reference prox located near compression and rotary tuckers, cam offset may need to adjusted; call Aagard for support |
| 23. | Run barrel cam for at least 30 minutes |
| a. | This step is required to ensure chain is run in and tensioning cylinders are at a position where they will stay for some time |
| 24. | With pressure still on air cylinders, loosen tightening screw attaching switch to cylinder |
| a. | Slide switch until it is made (light turns on) |
| c. | From its made position, move switch toward rod end 1/2" |
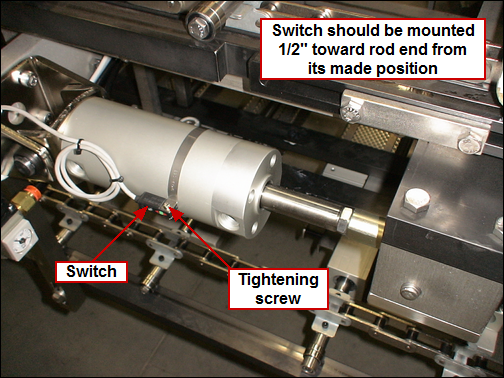
NOTE: If each cylinder has a switch, be sure to adjust both


